After extensive research, I decided to use
cloudflare workersto deploy a full-stack project. The frontend is built withVue, while the backend leverages thecloudflare workersecosystem along withHono,better-auth, anddrizzle.
Project Initialization
Setting up the full-stack project
npm create cloudflare@latest -- cards --framework=vueAfter initialization, the project is already configured with vite.config.ts, with the frontend code organized under the src directory and the backend under the server directory.
The project is designed with the frontend as the primary part and the backend as a supporting service.
Integrating better-auth
The purpose of this step is to use better-auth to manage authentication and account-related tables. The main tables include user, account, and verification. For session storage, we enable secondary storage using KV from cloudflare workers.
better-auth provides a full account management system, third-party login integrations, and a frontend SDK.
Configure the better-auth secret (related to password hashing, details not deeply explored here):
BETTER_AUTH_SECRET=If you’re using a regular database (not cloudflare workers which requires binding, HTTP triggering, and context retrieval), configuring better-auth is quite straightforward.
Configuring the database:
import { betterAuth } from "better-auth";import { drizzleAdapter } from "better-auth/adapters/drizzle";import { db } from "@/db"; // your drizzle instance
export const auth = betterAuth({    database: drizzleAdapter(db, {        provider: "pg", // or "mysql", "sqlite"    }),});
Use the CLI tool to generate and migrate schema:
npx @better-auth/cli generatenpx @better-auth/cli migrateSince cloudflare workers has its own special requirements, we use an open-source workaround: cf-script to generate schema:
import { getAdapter } from "better-auth/db";import { writeFile } from "node:fs/promises";import { resolve } from "node:path";import { initBetterAuth } from "../server/lib/auth";import { generateDrizzleSchema } from "./_vendors/drizzle-generator";
export default async (env: unknown) => {  const betterAuth = initBetterAuth(env);
  const output = await generateDrizzleSchema({    adapter: await getAdapter(betterAuth.options),    options: betterAuth.options,    file: resolve(import.meta.dirname, "../db/schema/better-auth-schemas.ts")  });
  await writeFile(output.fileName, output.code ?? "");
  console.log(`Better auth schema generated successfully at (${output.fileName} 🎉`);};
Then initialize the BetterAuth object in the global router:
type Bindings = {  DB: D1Database; // Assuming your D1 binding is named 'DB'  KV: KVNamespace; // Assuming your KV binding is named 'KV'};
interface Variables {  db: ReturnType<typeof drizzle>;}const app = new Hono<{ Bindings: Env; Variables: Variables }>();
app.use('*', async (c, next) => {  const db = drizzle(c.env.DB);  c.set('db', db);  await next();});
This sets up the db instance globally. Inside route handlers, you can then call the betterAuth instance like this:
export const auth = (env: Env): ReturnType<typeof betterAuth> => {  const db = drizzle(env.DB);
  return betterAuth({    ...betterAuthOptions,    database: drizzleAdapter(drizzle(env.DB), {      provider: "sqlite",      schema: {        user: schema.userTable,        account: schema.accountTable,        session: schema.sessionTable,        verification: schema.verificationTable,      },    }),    secondaryStorage: {      get(key) {        return env.KV.get(key);      },      set(key, value, ttl) {        return env.KV.put(key, value, { expirationTtl: ttl });      },      delete(key) {        return env.KV.delete(key);      }    },    baseURL: env.BETTER_AUTH_BASE_URL,    secret: env.BETTER_AUTH_SECRET,    emailAndPassword: {      enabled: true    },  });};
Example login route:
authRoutes.post('/login', async (c) => {  const db = c.get('db');  const requestBody = await c.req.json();  const JWT_SECRET = c.env.JWT_SECRET!;    try {      const { email, password, username } = requestBody;      const loginIdentifier = email || username;
      if (!loginIdentifier || !password) {        return c.json({ success: false, message: 'Email/username and password are required' }, 400);      }
      const resp = await auth(c.env).api.signInEmail({        body: { email: requestBody.email, password: requestBody.password }      });
      if (resp && resp.user) {        const user = resp.user;        const token = await generateToken(JWT_SECRET, user.id);
        const existingUser = await db.select().from(schema.userTable).where(eq(schema.userTable.id, user.id)).limit(1).get();
        return c.json({          success: true,          message: 'Login successful',          data: {            user: { id: user.id, username: user.name, email: user.email },            token          }        });      }      return c.json({ success: false, message: 'Invalid username or password' }, 400);    } catch (error) {      console.error('Login error:', error);      return c.json({ success: false, message: 'Login failed, please try again later', error }, 500);    }});
Using betterAuth APIs like signInEmail and signUpEmail is much simpler than implementing authentication logic manually.
Hono
As seen above, we used Hono for routing. Compared to raw cloudflare workers, Hono makes development smoother with robust middleware support. Its design is similar to express, making it convenient to implement features like authentication.
export const authenticateToken = async (c: Context, next: Next) => {  const db = c.get('db');  const JWT_SECRET = c.env.JWT_SECRET!;  try {    const authHeader = c.req.header('Authorization');    const token = authHeader?.split(' ')[1];
    if (!token) return c.json({ success: false, message: 'Access denied, token required' }, 401);    if (!JWT_SECRET) return c.json({ success: false, message: 'Server misconfigured: missing JWT secret' }, 500);
    const decodedPayload = await verifyJWT(token, JWT_SECRET) as { userId: string };    const user = await db.select().from(schema.userTable).where(eq(schema.userTable.id, decodedPayload.userId)).limit(1).get();
    if (!user) return c.json({ success: false, message: 'Invalid authentication token' }, 401);
    c.set('user', user);    await next();  } catch (error) {    console.error('Authentication error:', error);    if (error instanceof ExpiredTokenError) return c.json({ success: false, message: 'Token expired' }, 401);    if (error instanceof InvalidSignatureError) return c.json({ success: false, message: 'Invalid token signature' }, 401);    return c.json({ success: false, message: 'Internal server error' }, 500);  }};
Hono also supports route grouping, allowing you to prefix better-auth routes for cleaner management:
import { Hono } from "hono";import { auth } from "./auth";
const app = new Hono();
app.route('/api/auth', async (c) => {    return auth.handler(c.req.raw);});
The frontend can then call /api/auth/sign-in/email for login.
drizzle
drizzle is naturally integrated into the Hono handlers since we already bound db globally:
app.use('*', async (c, next) => { const db = drizzle(c.env.DB); c.set('db', db); await next();});Then queries are straightforward:
const db = c.get('db');const user = await db.select().from(schema.userTable).where(eq(schema.userTable.id, decodedPayload.userId)).limit(1).get();Transaction operations are also supported. Normally, you can start a transaction simply by using db.transaction:
await db.transaction(async (tx) => { // Delete the user account await tx.delete(schema.userTable).where(eq(schema.userTable.id, userId)); // Delete the cards created by the user await tx.delete(schema.cardsTable).where(eq(schema.cardsTable.userId, userId));});However, Cloudflare Workers with D1 is a bit special. As suggested in this article What’s new with D1, it’s recommended to use db.batch instead.
Environment Variables Management
Although the official docs explain this in detail, here’s a recommended approach:
- In development, use a
.envfile (never commit this file to source control):
BETTER_AUTH_SECRET=BETTER_AUTH_BASE_URL=http://localhost:5173DRIZZLE_ACCOUNT_ID=DRIZZLE_DATABASE_ID=DRIZZLE_TOKEN=
## jwtJWT_SECRET=JWT_EXPIRES_IN=
VITE_API_BASE_URL=/api- In production, configure environment variables in the Cloudflare dashboard.
Since Cloudflare Workers treats
wrangler.jsoncorwrangler.tomlas the single source of truth, add:
keep_vars: trueOtherwise, deploying with wrangler deploy may override or remove dashboard-configured variables.
JWT
Although Hono is used, Hono’s built-in JWT solution isn’t supported in the Cloudflare environment due to missing dependencies. Therefore, it’s recommended to implement it yourself.
export const signJWT = async (payload: Record<string, unknown>, secret: string, expiresIn = '7d') => {  const encoder = new TextEncoder();  const key = await crypto.subtle.importKey(    'raw',    encoder.encode(secret),    { name: 'HMAC', hash: { name: 'SHA-256' } },    false,    ['sign']  );
  const header = {    alg: 'HS256',    typ: 'JWT'  };
  // Calculate expiration time  const exp = Math.floor(Date.now() / 1000) + (expiresIn === '7d' ? 7 * 24 * 60 * 60 : 3600); // Default to 7 days expiration
  const payloadWithExp = { ...payload, exp };
  const headerBase64 = base64UrlEncode(JSON.stringify(header));  const payloadBase64 = base64UrlEncode(JSON.stringify(payloadWithExp));
  // Sign  const data = `${headerBase64}.${payloadBase64}`;  const signatureBuffer = await crypto.subtle.sign('HMAC', key, new TextEncoder().encode(data));  const signatureBase64 = base64UrlEncode(String.fromCharCode(...new Uint8Array(signatureBuffer)));
  return `${data}.${signatureBase64}`;};
// Encodeconst base64UrlEncode = (str: string) => {  return btoa(String.fromCharCode(...new TextEncoder().encode(str)))    .replace(/=/g, '')    .replace(/\+/g, '-')    .replace(/\//g, '_');};
export const verifyJWT = async (token: string, secret: string) => {  const [headerBase64, payloadBase64, signatureBase64] = token.split('.');  const encoder = new TextEncoder();  const key = await crypto.subtle.importKey(    'raw',    encoder.encode(secret),    { name: 'HMAC', hash: { name: 'SHA-256' } },    false,    ['verify', 'sign']  );
  const data = `${headerBase64}.${payloadBase64}`;
  // Decode signature  const signatureBuffer = await crypto.subtle.sign(    'HMAC',    key,    new TextEncoder().encode(data)  );
  const computedSignatureBase64 = base64UrlEncode(String.fromCharCode(...new Uint8Array(signatureBuffer)));
  // Verify signature match  if (computedSignatureBase64 !== signatureBase64) {    throw new InvalidSignatureError('Invalid signature');  }
  // Verify expiration time  const payload = JSON.parse(atob(payloadBase64));  const currentTime = Math.floor(Date.now() / 1000);  if (payload.exp && payload.exp < currentTime) {    throw new ExpiredTokenError('Token has expired');  }
  return payload;};
Email Functionality
The email functionality is an essential part of the website registration process, used to verify users’ email addresses. After integrating better-auth, the capabilities for sending emails and token verification are available, but some adjustments are still needed to implement them in our project.
Integrating Resend
We use the Resend service for email sending capabilities. First, you need to register for the Resend service, then add a domain in Resend. If your domain is managed on Cloudflare, by authorizing Resend, Resend will automatically add the relevant domain configurations on Cloudflare.
Add a domain,
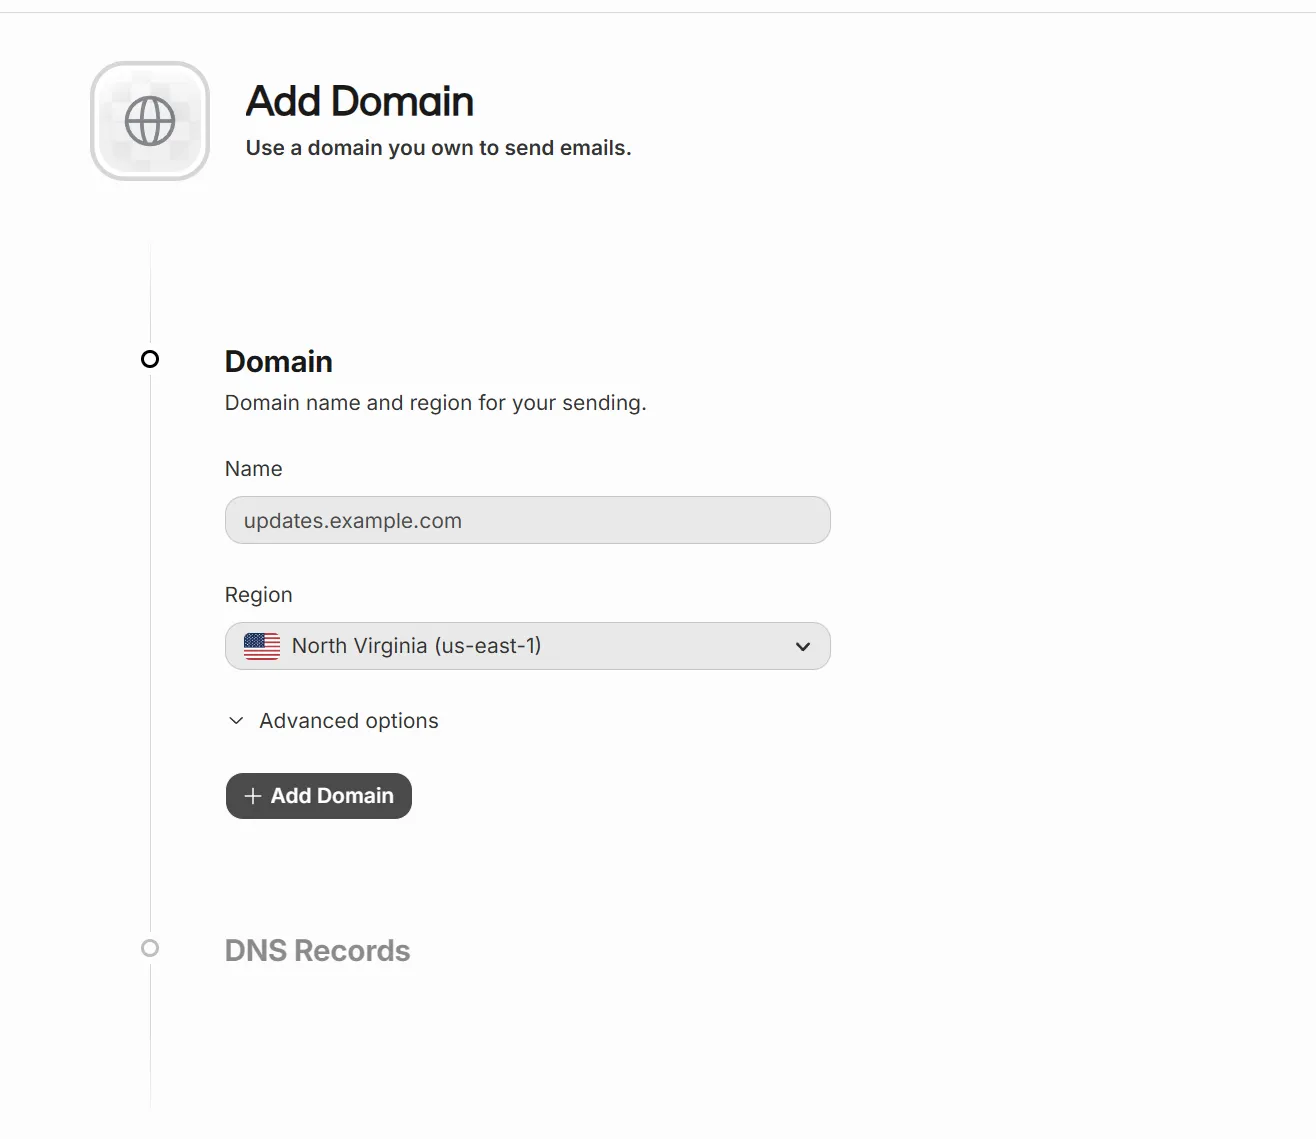
Configure DNS MX records and TXT records,

Integration with better-auth
First, you need to enable email verification. Refer to the documentation require-email-verification
emailVerification: { sendVerificationEmail: async ({ user, token }) => { await sendEmail(user.email, token, env.BETTER_AUTH_BASE_URL, env.RESEND_API_KEY); }, sendOnSignUp: true, autoSignInAfterVerification: true, expiresIn: 3600 * 24 // 24 hours },About sendOnSign
The reason this option is emphasized is that it is the key to actually enabling email verification. The official documentation require-email-verification
export const auth = betterAuth({ emailAndPassword: { requireEmailVerification: true, },});doesn’t actually work (suspected bug or caused by project configuration).
The correct solution is to set sendOnSignUp: true, but the official documentation notes that this will send an email every time signUpEmail is called. The solution is to return to the business logic and control that an email is not registered twice.
Implementing the sendEmail method
Since it runs in the Cloudflare Workers environment, you can’t get the Resend API key from process.env.RESEND_API_KEY like in a regular Node.js project. Here, we choose to pass the env.RESEND_API_KEY variable from the better-auth options configuration.
A simple email sending function is as follows:
import { Resend } from "resend"
export async function sendEmail(to: string, token: string, BETTER_AUTH_BASE_URL: string, RESEND_API_KEY: string) { const resend = new Resend(RESEND_API_KEY);
const emailHtml = `<a href="${BETTER_AUTH_BASE_URL}/verify?token=${token}" >Click to verify your email</a>`;
const { data, error } = await resend.emails.send({ to, subject: "Verify your email", html: emailHtml, });
if (error) { console.error("Failed to send email", error); throw new Error("Email send failed"); }
console.log("Email sent", data); return data;}However, this provides a poor user experience. It’s better to rewrite the email content into rich text using AI to create a concise and beautiful email body.
Verifying the token
Clicking the email verification link ${BETTER_AUTH_BASE_URL}/verify?token=${token} won’t directly call the backend API. Instead, it will first try to open the frontend project, as any link opened in the browser is managed by the project’s Vue router.
Therefore, we need to add a frontend route and Vue page: /verify -> Verify.Vue, and then call the backend API in this Vue page.
The backend API implementation is relatively simple: get the better-auth instance from the Cloudflare Workers context and call its verifyEmail API capability.
const result = await c.var.auth.api.verifyEmail({ query: { token },});Resending email verification
The token on the email verification link is valid for 24 hours. If the user forgets or doesn’t receive it, they can choose to resend it. Considering that resending might cause resource waste, the project has a daily limit on the number of resends.
The frontend calls the /api/auth/resend-email interface, which checks the user’s login status before calling the better-auth sendVerificationEmail API.
// better-auth will regenerate and send a new emailconst result = await c.var.auth.api.sendVerificationEmail({ body: { email: user.email }});Image Hosting Functionality
For the image hosting functionality, we use Cloudflare Workers’ R2. The chosen solution is to upload via Cloudflare Workers binding, access via public URLs, and use a custom domain.
Image Upload Functionality
const formData = await c.req.formData();const file = formData.get('file') as File;const fileKey = getFileKey(user.id, file.name);// Upload to R2const putResult = await c.env.R2.put(fileKey, file.stream(), { httpMetadata: { contentType: file.type, }, customMetadata: { uploadedBy: user.id, },});return c.json({ success: true, message: 'File uploaded successfully', fileUrl: `${c.env.R2_BUCKET_DOMAIN}/${fileKey}`});In the production environment, after successful image upload, the frontend receives a URL similar to https://i.sandural.cc/bhES2ttw9pHJvXYKKmzpo3MwDHnB/1756229492767-deepseek_mermaid_20250826_a901ed.png
In development (dev) mode, image resources are not actually uploaded to the cloud server but are stored in the .wrangler/state/v3/r2 directory. To properly display images in dev mode, handle it as follows:
R2_BUCKET_DOMAIN=http://localhost:5173/imagesThen add a backend route /images/:key{.+}, and read the stream from the R2 object storage using the key and return it.
const key = c.req.param("key")const obj = await c.env.R2.get(key)if (!obj) return c.text("Not found", 404)
return new Response(obj.body, {  headers: {    "Content-Type": obj.httpMetadata?.contentType ?? "application/octet-stream",  },})
Image Compression Functionality
Frontend compression uses browser-image-compression
npm install browser-image-compressionCompress to 1MB in size:
import imageCompression from 'browser-image-compression';const options = {    maxSizeMB: 1,    maxWidthOrHeight: 1920,    useWebWorker: true,}const compressedFile = await imageCompression(file, options);const newFile = new File([compressedFile], file.name, {    type: compressedFile.type,    lastModified: Date.now(),});
// Upload to serverconst response = await uploadApi.uploadImage(newFile);backgroundImage.value = response.fileUrl;
Backend Image Compression
This time, we adopt the solution from jsquash. After careful consideration, we reuse the author’s example approach, converting image formats such as jpeg/jpg/png to webp format, which is actually a good method for image compression.
import decodeJpeg, { init as initJpegWasm } from '@jsquash/jpeg/decode';import decodePng, { init as initPngWasm } from '@jsquash/png/decode';import encodeWebp, { init as initWebpWasm } from '@jsquash/webp/encode';
// @Note, We need to manually import the WASM binaries below so that we can use them in the worker// CF Workers do not support dynamic imports// @ts-ignoreimport JPEG_DEC_WASM from "../../node_modules/@jsquash/jpeg/codec/dec/mozjpeg_dec.wasm";// @ts-ignoreimport PNG_DEC_WASM from "../../node_modules/@jsquash/png/codec/pkg/squoosh_png_bg.wasm";// @ts-ignoreimport WEBP_ENC_WASM from "../../node_modules/@jsquash/webp/codec/enc/webp_enc_simd.wasm";

let putResult = nullconst extension = file.name.split('.').pop() as stringconst supportedExtensions = ['jpg', 'jpeg', 'png']if (supportedExtensions.includes(extension)) {  const imageData = await decodeImage(await file.arrayBuffer(), extension);  await initWebpWasm(WEBP_ENC_WASM);  const webpImage = await encodeWebp(imageData);  // Upload to R2  fileKey = fileKey.replace(/\.[^/.]+$/, '.webp')  putResult = await c.env.R2.put(fileKey, webpImage, {    httpMetadata: {      contentType: 'image/webp',    },    customMetadata: {      uploadedBy: user.id,    },  });} else {  // Upload to R2  putResult = await c.env.R2.put(fileKey, file.stream(), {    httpMetadata: {      contentType: file.type,    },    customMetadata: {      uploadedBy: user.id,    },  });}
Note that you need to adjust the configuration in vite.config.ts:
export default defineConfig({ optimizeDeps: { exclude: [ "@jsquash/png", "@jsquash/jpeg", "@jsquash/webp", ] }})Notes
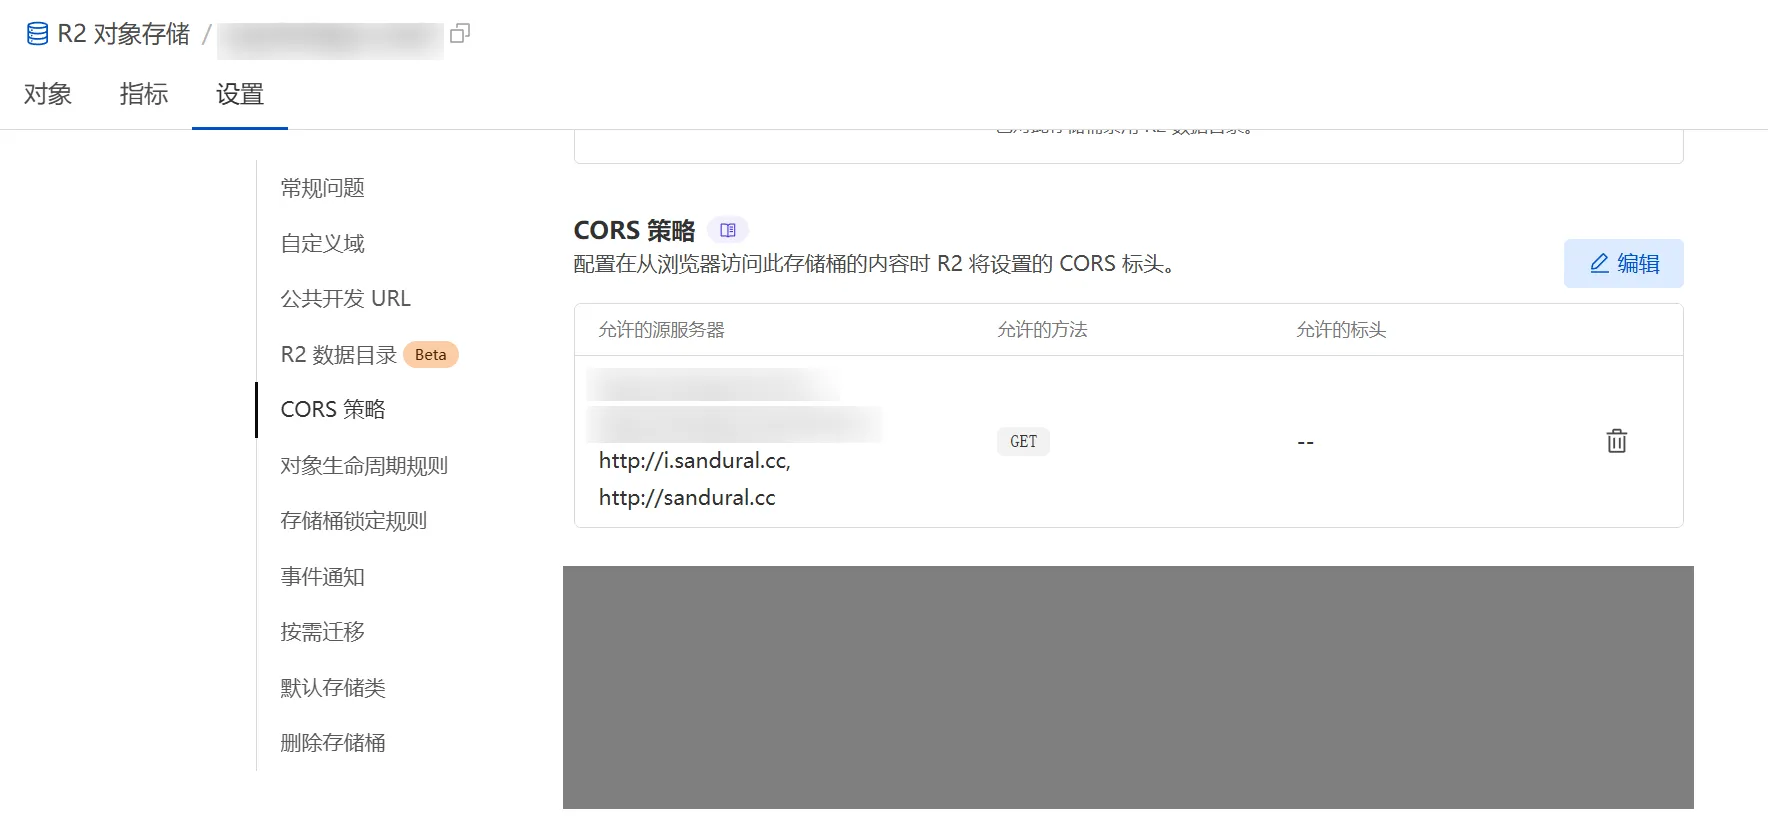
Since we use public URL access, the *.r2.dev subdomains provided by Cloudflare are basically inaccessible in China, so you must use your own independent domain, and a subdomain configuration is sufficient.
Additionally, due to public URL access, it’s recommended to properly configure CORS to prevent exceeding traffic limits.
Configuration reference
GitHub Login Integration
Create an OAuth App
First, you need to create a developer app. Log in to GitHub, open https://github.com/settings/applications/new, and create an OAuth App. Since we only need to obtain the user’s email address, using an OAuth App is the simplest and most convenient integration method.
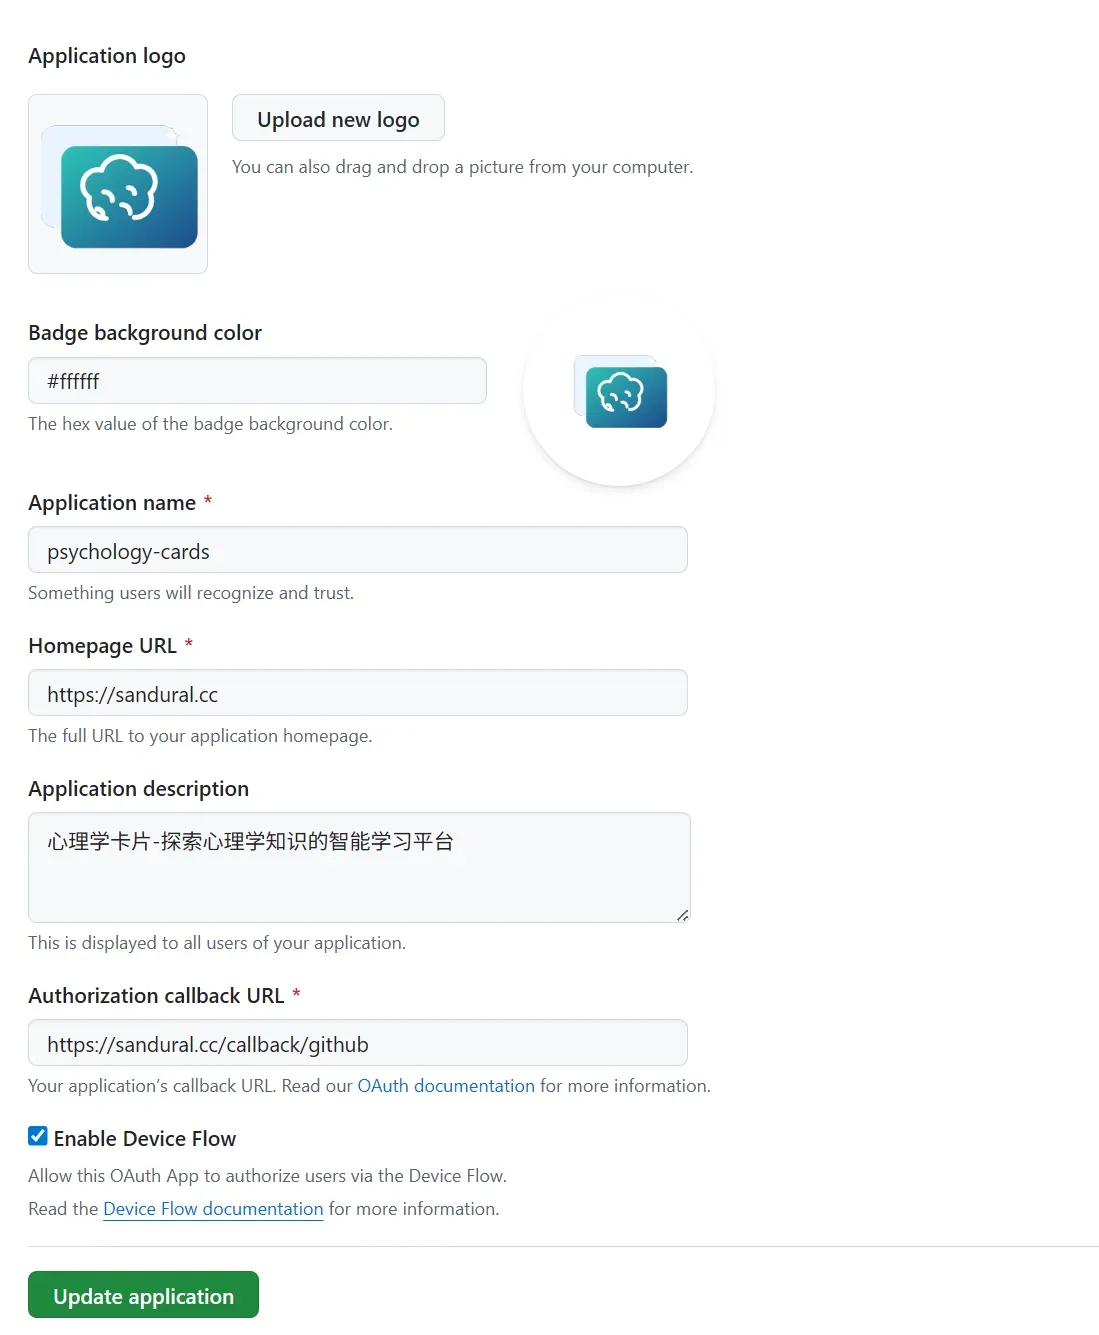
Fill in the following information:
- Application homepage URL: https://sandural.cc
- Authorization callback URL: https://sandural.cc/callback/github
Many developers find it troublesome that only one URL can be filled in for the callback URL field, which means it cannot support development environments (e.g., http://localhost:5173/callback/github). However, it is recommended to use the production environment URL consistently—corresponding solutions will be introduced later in this document.
After creation, you will obtain the client_id and client_secret.
Development Process
Modify the better-auth configuration and add the following settings:
Add GITHUB_CLIENT_ID, GITHUB_CLIENT_SECRET to the environment variables. Set GITHUB_REDIRECT_URL to https://sandural.cc/callback/github (fixed value).
socialProviders: { github: { clientId: env.GITHUB_CLIENT_ID as string, clientSecret: env.GITHUB_CLIENT_SECRET as string, redirectURI: env.GITHUB_REDIRECT_URL as string, },},Page Modifications
In a full-stack Cloudflare Workers + Vue project, integrating GitHub Login requires modifying the login page and adding a new callback authentication page.
- Add a GitHub Login Button
Call the backend API and use the API of thebetter-authinstance to initiate the first step of OAuth authorization login:
authRoutes.post('/login-social', async (c) => { const requestBody = await c.req.json(); const auth = c.var.auth as ReturnType<typeof createAuth>; try { const { provider } = requestBody; const response = await auth.api.signInSocial({ body: { provider: provider, callbackURL: 'https://sandural.cc/callback/github', }, }) console.log('signInSocial result', response) if (response?.url) { return c.json({ success: true, message: 'Login successful', data: { url: response.url } }) } } catch(err) { console.log('login-social error', err) } return c.json({error: 'Unknown error'}, 500)})After the frontend obtains response.url, it redirects to this address, which opens the GitHub authorization login page. Once the user clicks Authorize, they will be redirected to https://sandural.cc/callback/github?code=xxx&state=xxxx.
- Callback Authentication Page
Due to the characteristics of a full-stackCloudflare Workers + Vueproject, after redirecting from GitHub tohttps://sandural.cc/callback/github?code=xxx&state=xxxx, the frontend Vue router will take over first, and the frontend page will be displayed. Therefore, a new callback authentication page is required.
The callback authentication page needs to retrieve the code and state parameters from the URL query string and call the backend API to complete authentication:
Since better-auth does not expose an API for OAuth login callback authentication, you can execute this process through its handler() method:
const requestBody = await c.req.json();const { state, code } = requestBody;const request = new Request(`https://sandural.cc/api/auth/callback/github?code=${code}&state=${state}`)console.log('request', request)const response = await auth.handler(request)After completing the entire process, you will notice a new record added to account, where the value of the provider_id field is github (instead of credential).
Development Tips
The entire GitHub OAuth process does not involve GitHub calling the sandural.cc service API; it is completed entirely through page redirects (i.e., in the local browser). Therefore, you can temporarily resolve sandural.cc to the local IP address 127.0.0.1 to work with the local environment for code development.
- Configure the Hosts File
Add the following entry to your system’s Hosts file:
127.0.0.1 sandural.cc- Enable HTTPS for Local Development
By default, locally started services (e.g.,http://localhost:5173) use the HTTP protocol, not HTTPS. To fix this, introduce a local self-signed certificate and start an HTTPS service via Vite:
import { defineConfig } from 'vite'import mkcert from 'vite-plugin-mkcert'
// https://vitejs.dev/config/export default defineConfig({ plugins: [ vue(), vueDevTools(), cloudflare(), process.env.HTTPS === 'true' ? mkcert({ hosts: ['sandural.cc']}) : undefined ], server: { host: process.env.HTTPS === 'true' ? 'sandural.cc' : '0.0.0.0', port: process.env.HTTPS === 'true' ? 443 : 5173 }})- Update the Start Script in
package.json
Add an HTTPS-enabled development script:
"scripts": { "dev:https": "cross-env HTTPS=true vite"}Debugging Tips
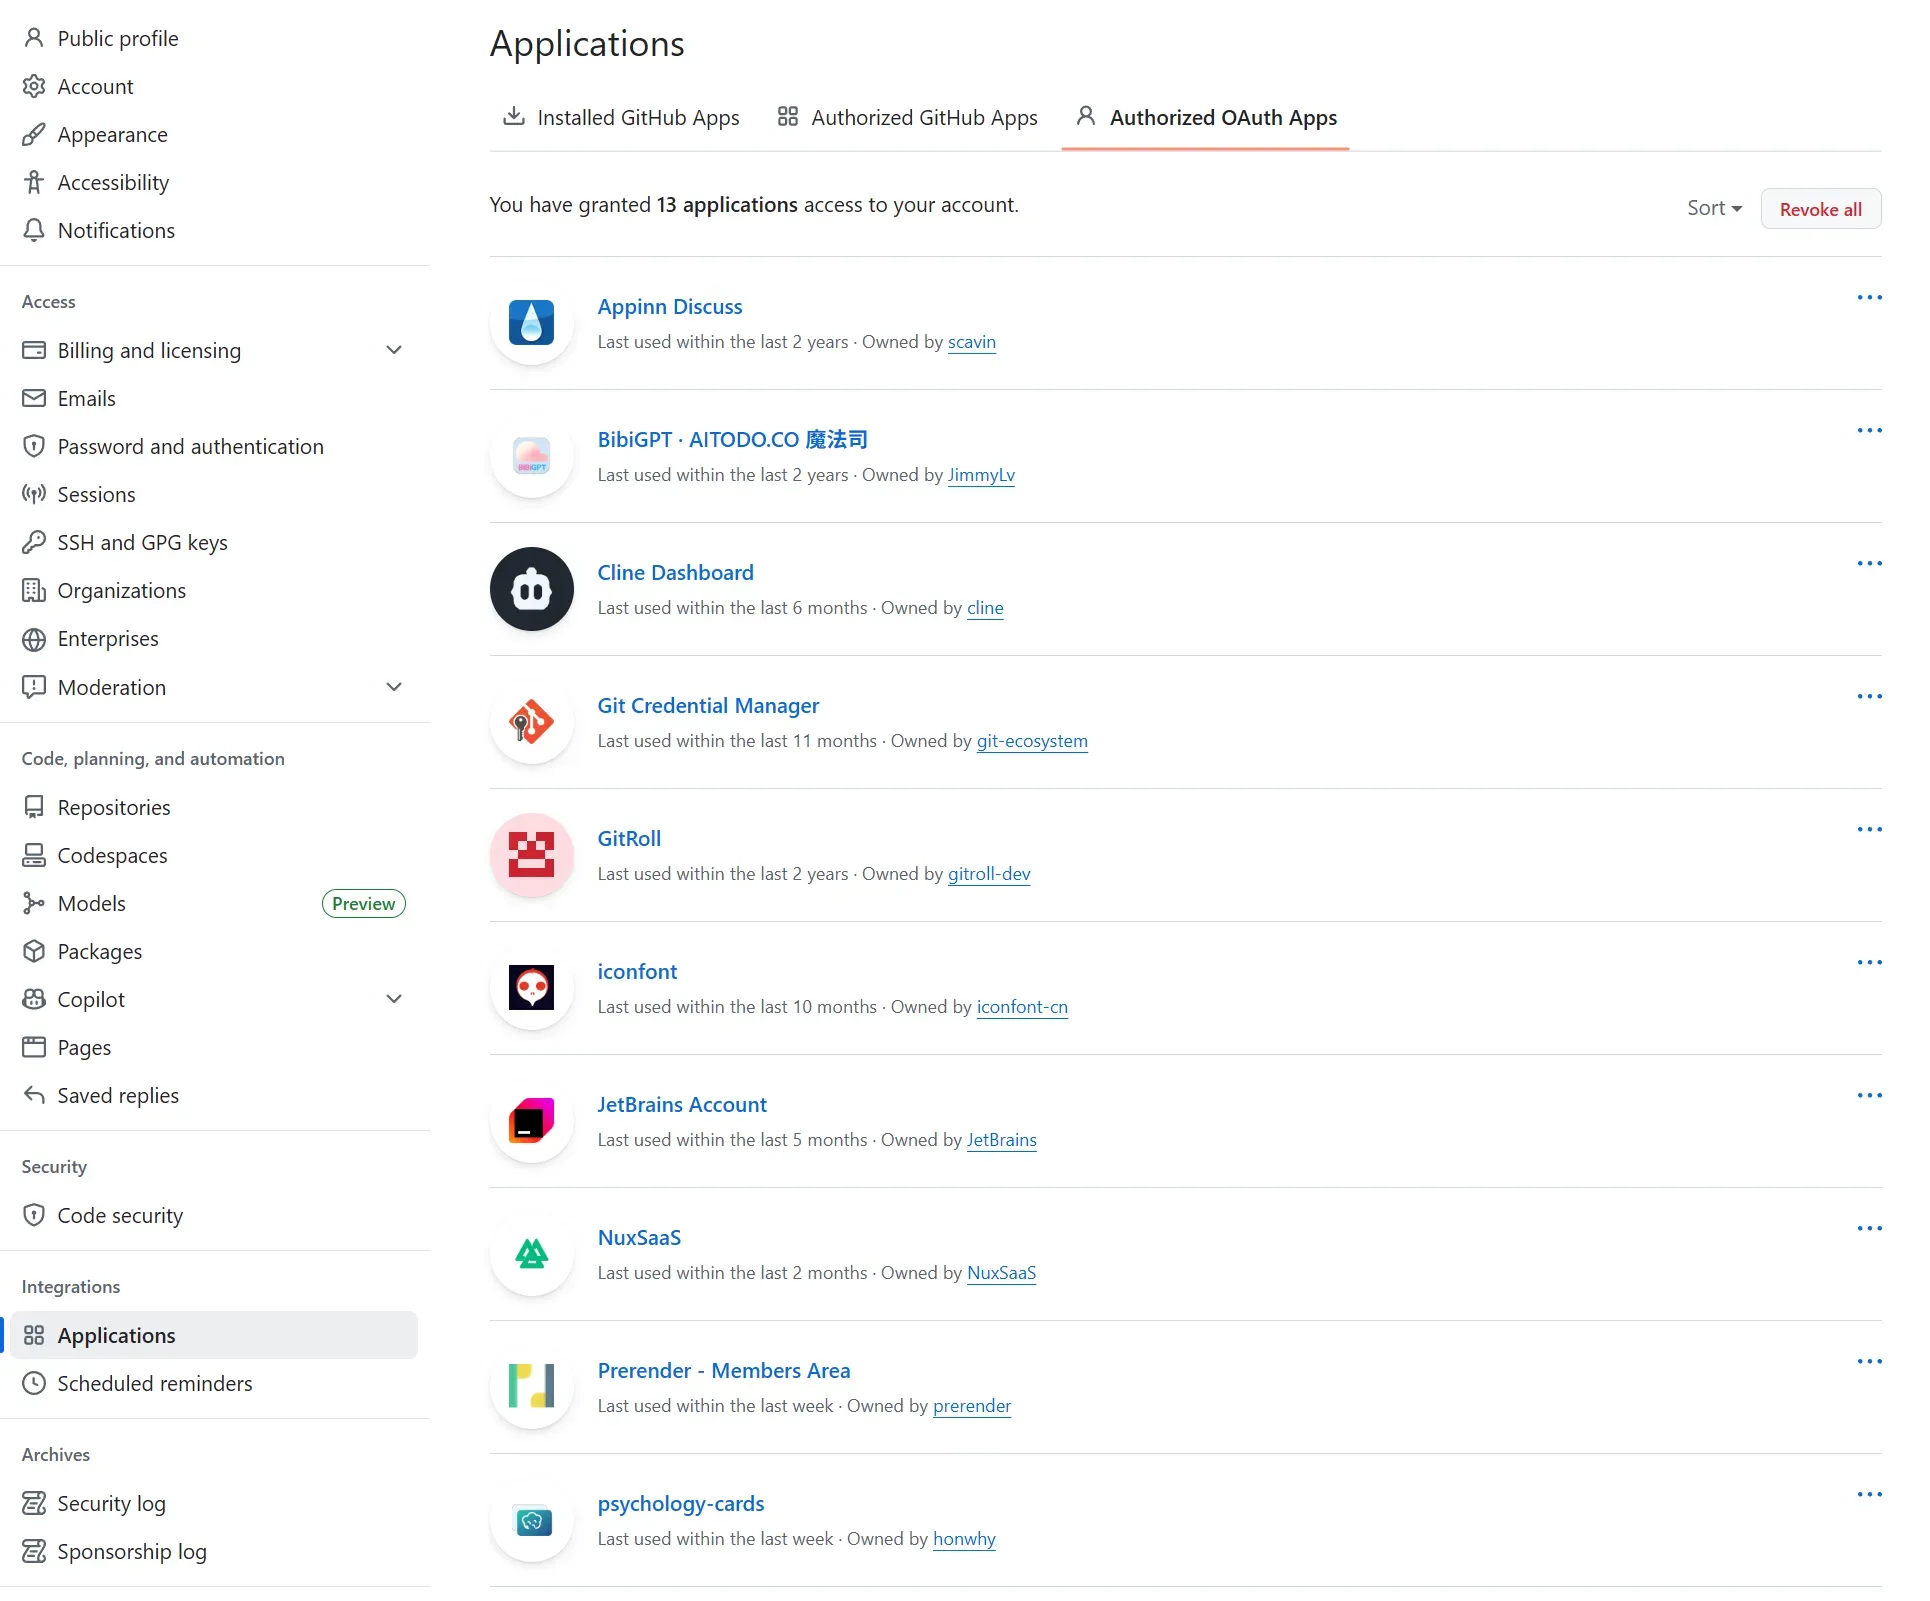
During debugging, you may need to repeatedly authorize and revoke authorization. You can manage this via the following URL: https://github.com/settings/applications
Troubleshooting
Since better-auth manages login state based on the session-cookie scheme, problems may occur if it’s not fully supported as required.
For example, when changing passwords, missing or incorrect cookies in the request headers can cause failure to retrieve the session in the internal implementation of changePassword, ultimately leading to API call failure.
const response = await auth.api.changePassword({ body: { currentPassword, newPassword, revokeOtherSessions: true, }, headers: c.req.raw.headers, asResponse: true, }).catch((error) => { console.error('Change password error:', error); return c.json({ success: false, message: 'Current password is incorrect' }, 401); })The solution is to manually set the cookie during login and then pass accurate headers when changing the password.
Setting cookies during login
const response = await auth.api.signInEmail({  body: {    email: requestBody.email,    password: requestBody.password,  },  asResponse: true})responseCookies(c, response);
export function responseCookies(c: Context, response: Response) {  // console.log('Login response headers:', response.headers);  const cookie = response.headers.get('Set-Cookie')?.split(';')[0].split('=')[1] || ''  // console.log('Extracted cookie:', cookie);  setCookie(c, 'better-auth.session_token', cookie,    {      httpOnly: true, secure: true, sameSite: 'Lax', path: '/'      , maxAge: 7 * 24 * 60 * 60 // 7 days    })}
Passing headers when changing passwords
Since cookies contain special characters like %, it’s necessary to preprocess the request headers.
const cookie = decodeURIComponent(c.req.header('Cookie') || '')const headers = new Headers(c.req.raw.headers);headers.set('Cookie', cookie);
// ...const response = await auth.api.changePassword({  body: {    currentPassword,    newPassword,    revokeOtherSessions: true,  },  headers: headers,  asResponse: true,})
Also, don’t forget to update the cookie after a successful password change:
responseCookies(c, response);